Tag: best

  • Coody inflatable tents: Data-backed quick setup and family shelter

    Coody inflatable tents: Data-backed quick setup and family shelter

    Main image for Coody inflatable tents

    Table of Contents

    1. Coody inflatable tents: data-backed quick setup for families
    2. Performance and build quality of Coody inflatable tents
    3. Family-focused configurations and setup tips
    4. Coody inflatable tents FAQ
    5. Conclusion and practical takeaways

    Coody inflatable tents: data-backed quick setup for families

    inflatable camping tents image

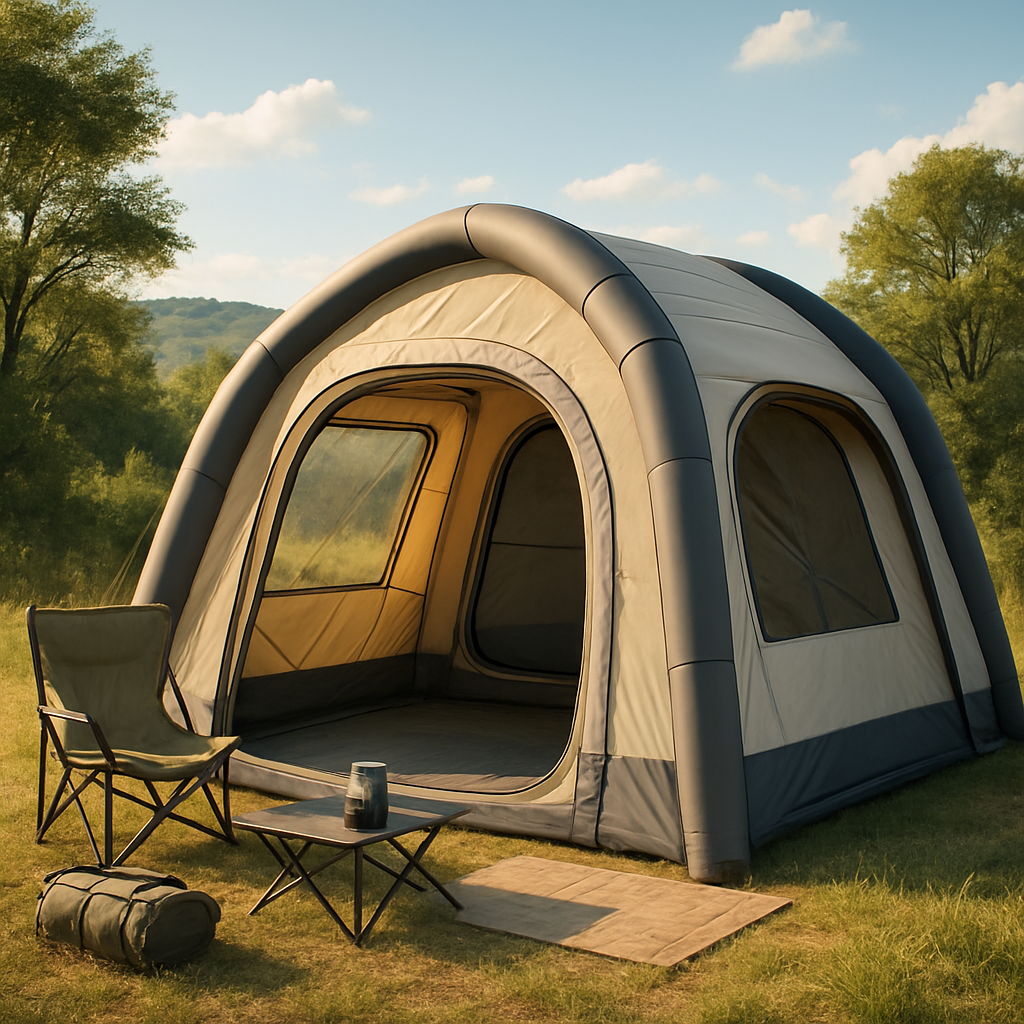
    Coody inflatable tents redefine setups with patented inflatable architecture that cuts the setup steps versus traditional poles. This approach fits under Coody air tents, often described as inflatable camping tents, and targets a family inflatable tent shelter that deploys quickly without sacrificing space. Market demand favors family-friendly design and intuitive pumps, making the best Coody inflatable tent for family camping a practical, time-saving choice for busy households. Quick inflation, durable seams, and compact storage meet families seeking dependable performance.

    Overview of Coody inflatable tents

    Key design points

    • Patented inflatable architecture reduces setup steps vs traditional poles
    • Market demand favors family-friendly design and intuitive pumps
    • Aligns with Coody air tents and inflatable camping tents branding

    Fast setup matters for family camping because it minimizes sun and weather exposure during pitching, helping everyone stay cooler or drier as the shelter goes up. For families wondering how to set up a Coody inflatable tent, the process is straightforward. It also smooths transitions for kids, reducing campsite drama during arrival. Quicker pitching shortens the window between travel and outdoor time, so meals, play, or rest can begin sooner. These realities set the stage for evaluating performance and build quality of Coody inflatable tents.

    Why fast setup matters for family camping

    Benefits in practice

    • Minimizes sun and weather exposure during pitching
    • Eases transitions for kids and reduces campsite drama
    • Supports turning arrival into outdoor time sooner

    Performance and build quality of Coody inflatable tents

    Coody inflatable tents deliver a reliable shelter experience by combining rapid, pole-free setup with sturdy materials designed for family camping. Across the line—Coody inflatable tents, Coody air tents, and Coody pop up tents—the focus is on quick inflation, weather resilience, and comfortable interior space for multiple campers. The goal is to reduce setup time without sacrificing durability, so you can spend more time enjoying the outdoors.

    Deployment speed and mechanics

    Typical setup times

    • Setup times vary by model and pump type. High-end options with built-in or fast electric pumps commonly inflate the main airframe in roughly 60–90 seconds; larger family tents with manual pumps may take 2–4 minutes. Compact, backpack-friendly Coody air tents stay near the 1–2 minute mark with a hand pump.

    Valve design and pump hardware

    • Quality valve design matters. One-way valves and robust pump heads reduce air loss, while dual-stage or high-volume pumps help achieve consistent pressure even as external wind gusts or temperature shifts occur. Properly seated valves prevent leaks during rapid inflation and under load.

    Consistent frame-free design

    • A frame-free, air-frame approach minimizes snag points during quick pitches. This design speeds up deployment but benefits from organized staking and guy lines to maintain shape in windy conditions. Lay the tent flat, connect the pump, and monitor inflation to ensure a stable, even build across the shelter.

    Durability and materials

    Ripstop fabrics and reinforced seams

    • Expect ripstop nylon or polyester with TPU or PU coatings and reinforced, double-stitched seams. These choices support long-term use for family trips, resisting tears from campsite surfaces and general wear.

    UV resistance and weather sealing

    • UV-stable coatings protect fabric from sun fade, while taped seams and weather-sealed floor sections guard against light rain and ground moisture. A reliable waterproof rating on critical seams helps keep interior dry during changing skies.

    Quality seams and inner linings

    • High-quality seams and thoughtfully finished inner linings contribute to insulation and comfort. Breathable inner fabrics reduce condensation buildup, while lined panels improve warmth without adding clutter. A good inner layout also supports easy sleeping arrangements and personal storage pockets.

    These design elements translate to dependable performance when you’re coordinating a family setup, gear, and quick shelter needs. With a solid foundation in inflation efficiency and rugged construction, you’re ready to explore family-focused configurations and setup tips that optimize space, airflow, and comfort.

    Family-focused configurations and setup tips

    Coody inflatable tents excel in family camping thanks to quick setup, stable walls, and flexible interior layouts. When planning for kids, gear, and shared meals, prioritize sleeping capacity, accessible storage, and outdoor shelter extensions that keep everyone comfortable from dawn to dusk.

    Best Coody inflatable tent for family camping

    Sleeping capacity and layout

    Choose models that balance room count with actual sleeping spots. A two-room or three-room family design lets adults sleep separately from kids, while still sharing a common living area. For a family of four to six, a 5–6 person Coody inflatable tent with a dedicated kids’ room and a separate parents’ area often delivers the best mix of privacy and interaction.

    Vestibule space and gear organization

    Assess vestibule footprints for coats, boots, strollers, and backpacks. A larger vestibule (ideally 15–25 sq ft per entry) keeps muddy shoes outside the sleeping zones and makes late-night access to gear quieter. Look for built-in storage pockets and a gear loft to keep small items organized.

    Privacy and room dividers

    Interior dividers or modular room walls help create quiet zones for bedtime routines, changing, or quiet reading. A tall peak height improves standing comfort in the main living area, while integrated pockets keep headlamps and chargers within reach.

    Setup time and durability

    Coody inflatable tents typically set up in 5–10 minutes with a standard air-beam pump. Prioritize models with reinforced seams, robust guyline anchors, and a durable groundsheet. Quick-release valves and clear pump instructions reduce setup errors at the campsite.

    Built-in awnings and shelter extensions

    Outdoor living space benefits

    A built-in awning transforms the front or side into shaded space for cooking, snacks, or playtime. This shelter extension protects kids from sun and drizzle while keeping the main tent interior cooler and more organized.

    Check clearance and entry flow

    Ensure enough clearance for doors, vehicles, and ingress/egress. Position the tent so the entry points and any awning extensions don’t bottleneck traffic, especially when loading gear or entering after dark.

    Compact options: Coody inflatable tent for backpacking

    Weight targets and packed size

    For trail-friendly packs, seek lighter variants with a compact packed size that still deliver a livable interior. Aim for models that balance weight with durable fabrics and a reasonable interior volume for short to mid-length trips.

    Durability and interior comfort

    Even in compact form, prioritize weatherproof seams, a robust floor, and adequate headroom. A well-insulated, well-ventilated cabin keeps nights comfortable in variable conditions.

    Setup efficiency on trail

    Practice setup at home to reduce time on the trail. A step-by-step sequence—lay footprint, unfold air-beam sections, connect air pumps, stake corners, then vent and peg guylines—keeps your inflatable camping tents ready for quick shelter during unpredictable weather.

    Coody inflatable tents FAQ

    Coody inflatable tents offer fast shelter for family camping. This FAQ covers setup time, weather suitability, and model selection, including Coody air tents and pop up options.

    How long does setup take with a Coody inflatable tent?

    Most models go from packed to pitched in about 5-10 minutes with the included pump. On level ground, unfold, attach the air tubes, and inflate each chamber to the recommended pressure. Stake corners and tension guylines; extend a built-in awning only after stability.

    Are Coody tents suitable for all weather conditions?

    They handle typical camping weather well when used correctly, and serve as a reliable family inflatable tent shelter. Look for waterproof coatings, taped seams, and sturdy guylines. For heavy rain, deploy the awning and balance ventilation to reduce condensation. In strong winds or snow, use extra anchors and select sheltered sites.

    How do I choose the right Coody model for my family?

    Start with capacity and layout. For more gear space, pick a model with a built-in awning or large vestibule. If backpacking, consider a compact Coody inflatable tent or a lighter Coody air tent. Compare packed size, weight, and setup steps among Coody pop up tents and larger family inflatable tent shelters to find the best fit.

    Conclusion and practical takeaways

    Coody inflatable tents simplify family camping by pairing quick setup with dependable structure. For families evaluating the best Coody inflatable tent for family camping, focus on how many sleepers you need, how well the tent manages temperature and condensation, and how the price aligns with your trips. If you often camp in mixed weather, prioritize models that balance living space with efficient airflow and easy gear storage. You’ll see the strongest results with a family inflatable tent shelter that combines ample sleeping rooms, built-in shelter features, and straightforward packing.

    Final buying considerations for families

    Balance sleeping capacity, insulation, and price with your camping style

    Match the tent size to your typical trips. A family of four benefits from a 6–8 person Coody inflatable tent, which provides room to move and space for gear without feeling cramped. In cooler climates, look for fabrics that offer better insulation and a semi-closed vestibule to reduce heat loss at night. If you’re weekend warriors, prioritize a lighter setup with fewer seams and a lower price point. For long-season use, factor in durability and repairability—these tents often become a multi-year family investment.

    Prioritize built-in awnings, ventilation, and gear storage options

    A built-in awning extends living space and cuts down on rain decks near the door. Ventilation matters for kid comfort and moisture control—mesh panels and two-way vents reduce condensation without drafts. Gear storage options like ceiling pockets, hallway organizers, and external vestibules keep clutter off the sleeping areas and make spontaneous gear access easier on family trips. When you spot models advertised as having a built-in awning, ventilation hubs, and ample internal pockets, they’re typically the most practical for busy families.

    Maintenance and care for longevity

    Dry and store tents properly after use to prevent mold

    Always air out fully, remove damp ground mats, and store in a dry, cool place. A quick wipe-down of zippers and seams prevents rust and mold build-up. Use the included carry bag or a breathable sack to avoid moisture trapping.

    Regularly inspect valves, seams, and pump seals; perform minor repairs promptly

    Before each trip, check inflation valves for leaks, inspect seam tape, and test the pump seals. If you notice a slow leak, patch it immediately with the repair kit and reseal the valve to extend the tent’s life.

    Tips for first-time setups with children

    Practice in a safe backyard to build muscle memory

    Set up the Coody inflatable tent in daylight, rehearse inflating, staking, and door opening. This reduces stress on travel day and helps kids predict what happens next.

    Create a simple setup checklist and assign roles

    Assign one adult to pump, another to stake anchors, and a child to help organize sleeping bags. A one-page checklist keeps everyone aligned and speeds the process.

    Pack comfort items to ease kids’ transition to the tent

    Include familiar blankets, a small nightlight, favorite plush, and quiet activities. A familiar bedtime routine helps children settle faster and makes family trips calmer.

  • Camping tents: A data-driven guide to durability and weight

    Camping tents: A data-driven guide to durability and weight

    Main image for Camping tents

    Table of Contents

    1. A data-driven overview of camping tents
    2. Durability and weight benchmarks across tent categories
    3. Practical buying guide: easy setup, weight, and capacity
    4. Camping tents FAQ
    5. Conclusion: data-driven recommendations and a practical checklist

    A data-driven overview of camping tents

    Data on Camping tents reveals how fabric weight, pole material, seam construction, and packed size shape real-world performance. Across categories—from outdoor tents and backpacking tents to family camping tents—learn how to choose a family camping tent, and the weight vs. durability trade-off guides winners for best lightweight tent for camping, weather resistant tent for camping, and easy setup tent for beginners. For two person tents and durable camping tents suited to multiple seasons, aligning pack weight with terrain and trip length keeps comfort high without overburdening the kit.

    What the data reveals about camping tents

    Datasets track fabric weight, pole material, seam construction, and packed size

    Durability vs. weight trade-offs guide category recommendations

    Key metrics for durability and weight

    Weight: packed vs. trail, volume, and packing efficiency

    Durability indicators: denier rating, seam sealing, zipper quality, and rainfly coverage

    Understanding these data points matters when you compare models—durable camping tents that excel in wind, rain, and cold still need compact packed size and manageable setup. That insight sets the stage for durability and weight benchmarks across tent categories.

    Durability and weight benchmarks across tent categories

    Across camping tents, durability and weight define the core tradeoffs you’ll face on every trip. Durable camping tents sit higher on weather resistance and long-term use, while best lightweight tents shave ounces without sacrificing core protection. The goal is to align your choice with planned routes—backpacking, family car camping, or multi-season use—without overpaying in weight or underestimating durability.

    Two person tent vs family camping tent

    Capacity, footprint, and interior space considerations

    Two person tents are engineered for two occupants with limited gear. Typical floor footprints run about 29–40 sq ft (2.7–3.7 m²), with one vestibule for a bit of gear. Interior space tends to be compact, offering enough headroom for two and enough room to store packs if you corral gear under the vestibule.

    Family camping tents span four to six (or more) occupants and emphasize livable space. Footprints commonly fall in the 60–110+ sq ft range, with interior layouts that accommodate multiple rooms or a larger living area. Headroom improves noticeably, often in the 4.5–6 ft range in mid‑sized models, and many include two vestibules to keep gear dry and accessible during inclement weather.

    Weight ranges and durability expectations by category

    Two person tents typically weigh about 2–4 kg for lightweight 3‑season models, and 3–5 kg for more rugged builds with durable fabrics and stronger rain protection. Expect fabrics in the 68D–75D nylon/poly blends and floors around 150D–180D polyurethane or fabric with a durable coating; common rainfly ratings sit around 1500–3000 mm for mid-range protection.

    Family camping tents push toward 6–12 kg, with thicker fabrics (often 70D–150D blends), heavier floors, and larger rainflies designed to survive frequent family use and longer stays. They frequently feature multi‑room interiors, robust pole systems, and reinforced zippers, all aimed at durability across seasons and setups. For truly durable camping tents intended for multiple seasons, expect reinforced seams, taped or welded joints, and corrosion‑resistant hardware to withstand frequent pitching and weather exposure.

    Best lightweight tent for camping

    Target weights for minimalist backpacking tents (1–3 kg)

    For minimalist backpacking, target weights fall broadly into:

    • 1.0–1.5 kg: compact solo or two‑person ultralight options with lighter fabric, often single‑wall or hybrid builds.
    • 1.5–2.5 kg: mainstream lightweight tents offering better durability and more complete weather protection.
    • 2.5–3.0 kg: two‑person setups with larger vestibules or enhanced durability while staying in the light‑weight range.

    These weights align with practical trips where you balance rapid setup, wind-resistance, and weather protection without turning the pack into a burden.

    Material choices and design features that maximize durability at light weight

    • Fabrics: high-tenacity ripstop nylon or polyester in the 15–30D range, with silicone or polyurethane coatings for weather resistance; consider Dyneema or similar ultra‑light options only if you need top‑tier durability at a higher cost.
    • Floors and coatings: bathtub floors in 30–70D for lightness, with fully taped seams and a durable floor coating to resist abrasion.
    • Poles: aluminum (strong, light, and durable) or advanced composite options in select models; designs that use cross‑ridge or semi‑geodesic layouts to improve stability.
    • Construction: two‑wall versus single‑wall tradeoffs—double-wall tents offer better condensation control and longer life in harsher weather; robust zippers, weatherproof fly, and reinforced guy lines improve resilience.
    • Details: quality seams, storm flaps, and weatherproof reinforcements at stakes and corners; reliable vestibule doors and easy‑to‑repair components.

    These benchmarks feed into a practical buying guide: easy setup, weight, and capacity.

    Practical buying guide: easy setup, weight, and capacity

    Choosing camping tents means balancing quick setup, manageable weight, and sufficient space for everyone. Whether you’re eyeing outdoor tents for weekend trips, a backpacking tent for lighter treks, or a family camping tent for mixed groups, a thoughtful approach saves headaches on the trail. The goal is a durable camping tent that handles weather, packs small, and fits your crew—without overcomplicating camp mornings or packing lists.

    Easy setup tent for beginners

    Features to look for

    • Color-coded poles and sleeves to guide assembly.
    • Pre-attached guylines and a simple clip system for fast setup.
    • One-piece hub or pop-out design that reduces fiddling and time in wind.
    • Interior pockets and a top hook for lighting.

    Hands-on tips

    • Practice pitching at home with your gear to lock in a routine.
    • Lay out stakes and guylines first, then stand the tent body on the footprint.
    • Run a quick test in a dry room to confirm zippers, clips, and vents operate smoothly.

    How to choose a family camping tent

    Assess headroom, vestibule space, and door count

    • Aim for center height around 6 ft (183 cm) or more for comfortable movement.
    • Vestibule space should cover gear per person (roughly 15–20 sq ft total per family member adds up quickly).
    • Two sturdy doors reduce late-night traffic and enhance access from both sleeping areas.
    • For two rooms, look for separate vestibules that help manage gear and moisture.

    Consider seasonality, durability, and ease of setup for mixed groups

    • Three-season tents fit most climates; four-season options add strength for winter conditions.
    • Prioritize durable fabrics, robust zippers, and reliable seams when groups include kids or older campers.
    • Choose a setup that stays simple even when a mix of backpacking tents and family tents are camping together.

    Weather resistant tent for camping

    Key ratings

    • Hydrostatic head (water column): 1500–2000 mm for typical three-season use; 3000 mm+ for storm-prone or winter environments.
    • Taped seams at all junctions, plus a waterproof floor (bathtub-style floors help prevent seepage).
    • DWR coating on the exterior to shed light rain and mist.

    Real-world checks

    • Moisture management: ensure vents and mesh panels promote airflow to reduce condensation, especially on warm nights.
    • Ventilation: look for adjustable vents and a canopy to direct airflow while keeping rain out.
    • Note: these standards apply across outdoor tents and multi-brand lines, including popular options for best lightweight tent for camping and durable camping tents for multiple seasons.

    Camping tents FAQ

    durable camping tent for multiple seasons image

    Choosing the right Camping tents means balancing weight, space, and weather protection. This guidance helps solo hikers, families, and seasonal campers select reliable outdoor tents, from backpacking tent options to durable camping tents, and ensures easy setup for beginners. Use these checks to compare a two person tent, a family camping tent, and versatile all-season options.

    What is the best lightweight tent for camping?

    Target weight and balance

    For solo adventures, target 1–3 kg. Balance weight with weather rating and durability; lighter units may trade wind resistance.

    Real-world validation

    Check independent reviews for wind performance, condensation control, and long-term reliability.

    Easy setup for beginners

    Easy setup for beginners—look for models marketed as the best lightweight tent for camping.

    How do I choose a family camping tent?

    Space reality

    Compare labeled capacity vs actual space with kids and gear; include vestibules for gear storage and quick exits.

    Setup and durability

    Prioritize easy setup, durable fabrics, and multi-season usability for family trips.

    Future-proof features

    Choose a family camping tent that scales with growing needs and avoids cramped layouts.

    What makes a weather resistant tent for camping?

    Core weather features

    Hydrostatic head rating, taped seams, rainfly coverage, and floor sealing signal weather resistance.

    Climate management

    Ventilation and quality zippers prevent condensation and leaks in varied conditions.

    Build quality

    Reinforced corners and sturdy poles maximize long-term reliability in durable camping tents.

    data-driven recommendations and a practical checklist

    Choosing Camping tents relies on clear metrics and real-world use. Use objective data to compare options, then tailor your pick to how you plan to use them—backpacking, family trips, or car camping. Below is a practical, data-backed guide to help you navigate outdoor tents selections and setups.

    Key takeaways

    Use objective metrics (weight, durability, weather resistance) to compare camping tents

    Compare trail weight (the weight you carry) for backpacking tents versus total packed weight for family or car camping models. For a two person tent, trail weights commonly fall in the 3–5 lb range; family camping tents often run 8–15+ lb. Aim for a durable camping tents baseline: 3-season fabrics with good seam sealing and reliable zippers, plus a sturdy pole system. Hydrostic head (HH) ratings around 1500–3000 mm indicate solid weather resistance for three-season use; 3000–5000 mm suits harsher shoulder-season conditions. Material choices such as 20–40D nylon or 75D polyester with reinforced seams typically balance weight and durability.

    Durable camping tents that are lightweight and multi-season ready offer the best value for different trips

    A lightweight, multi-season setup reduces gear swaps. For example, a 3-season tent with 30–40D nylon, aluminum poles, and a taped seam can cover weekend backpacking and spring/fall trips, while a true four-season model with thicker fabrics and stronger poles expands into winter excursions. Look for practical durability signals: robust fabric perimeters, reinforced stake points, and a dependable rainfly that extends coverage over doors and vestibules. Over the long run, these tents provide better value than multiple single-use models.

    Tailor your choice to intended use: backpacking, family trips, or car camping

    Backpacking tents prioritize weight and compactness; family camping tents prioritize space and quick setup; car camping can favor durability and comfort, with generous vestibules and bigger living spaces. If you’re choosing a two person tent for solo missions, a compact, fast-pack option around 3–5 lb makes sense; for family camping, plan for at least 6–8 people or a pair of adjacent tents for flexibility.

    Practical checklist for buying and using camping tents

    Define capacity and weight targets, and set a weather rating

    Set a firm target capacity (e.g., 2P, 4P, or 6–8P) and a weight ceiling (3–5 lb for solo/backpacking, 8–15 lb for family tents). Define weather expectations: 3-season for most campsites, 4-season if winter camping is likely.

    Inspect materials: fabric denier, seam sealing, zipper quality, pole system

    Check fabric denier (typical 20–40D for ultralight, 75D for sturdy shells), confirm full seam sealing, test zippers (YKK preferred), and evaluate the pole system (aluminum preferred over fiberglass for durability). Verify if a footprint or floor saver is included.

    Test pitch at home, verify setup time

    Set up the tent in 5–10 minutes for a larger family tent; aim for under 5 minutes for a compact 2P. Practice a complete rainfly setup to ensure weatherproofing and vestibule access.

    Budget for maintenance

    Allocate minimal maintenance: re-proof or seam-seal as needed, inspect zippers and poles at season transitions, replace worn guylines and stakes, and store dry to prevent mold. A well-maintained tent stays reliable across multiple seasons and trips.

  • Inflatable tents: A data-driven guide to durable, quick-setup options

    Inflatable tents: A data-driven guide to durable, quick-setup options

    Main image for Inflatable tents

    Table of Contents

    1. Inflatable tents: a data-driven guide
    2. Use-case profiles and model fit
    3. Setup efficiency and pumping options
    4. Inflatable tents FAQ
    5. Conclusion and practical buying checklist

    Inflatable tents: a data-driven guide

    Inflatable tents streamline setup and reduce pinch points, but choosing the right model requires real-world performance data. A data-driven approach lets families, hikers, and beach campers compare air tents, blow up tents, and pop up tents by durability, inflation speed, wind stability, and packed size.

    What sets inflatable tents apart

    Quick take

    • Airframe tents use internal tubes for structure instead of rigid poles, reducing pinch points and setup complexity.
    • Variants include air tents, blow up tents, and pop up tents; knowing the terminology helps compare models.

    Key performance metrics you should track

    Metrics

    • Durability of fabric, seams, and valve integrity under field conditions.
    • Inflation/deflation speed, required pump type, and energy use.
    • Stability in wind, weather resistance, and pack size when deflated.

    What you gain from a data-driven approach

    Outcomes

    • Sharper buying decisions across family camping, hiking, and beach trips.
    • Benchmark models against capacity, weight, price, and warranty.
    • Directly address long-tail use cases like best inflatable tents for family camping, guiding use-case profiles and model fit.

    Use-case profiles and model fit

    Inflatable tents streamline camp setup across scenarios, but the best fit depends on how you intend to use the space. Air tents and airframe designs excel when you need rapid deployment, stable interiors, and adaptable layouts. For families, hikers, and beach or festival trips, matching the model to use-case details—such as berth count, weight, and weather resilience—delivers tangible gains in comfort and reliability.

    Family camping and roomier layouts

    4-6 berth configurations

    Best inflatable tents for family camping prioritize multi-room layouts, headroom, and durable floors. Look for models that offer 4-6 berth options with a central living area and separate bedrooms. A higher ceiling—ideally around 1.9–2.0 meters—improves maneuverability for kids and gear. Vestibules provide weather-proofed footpaths to gear, minimizing clutter inside.

    Vestibules and easy access

    Prioritize twin doors or wide zip openings to reduce bottlenecks during gear swaps and bedtime routines. External vestibules extend dry storage for backpacks, strollers, or shopping bags, helping keep the living space tidy after a day outdoors.

    Seams and guyline stability

    Durable double-stitched or taped seams and robust guyline systems matter, especially in changing conditions. Look for reinforced corners and wide guylines with sturdy stakes or pegs to maintain shape in gusts, ensuring the airframe tents stay taut and secure.

    Lightweight options for hiking trips

    Target weight under 5 kg (11 lb)

    When shopping for lightweight inflatable tents for hiking trips, aim for total packed weight under 5 kg. Compact footprints reduce pack weight without sacrificing interior room, enabling longer treks with comfortable shelter.

    Compact packing and built-in pumps

    Efficient packing goes hand in hand with built-in pumps. Easy setup inflatable tents with built-in pumps reduce setup time at the campsite and minimize accessory gear to haul. If you choose a pop up tent style, ensure the pump mechanism is quiet and reliable.

    Inflation time and quiet operation

    In rugged environments, faster inflation times and quieter operation lessen fatigue and disruptiveness. Some airframe tents feature optimized inflate/deflate cycles that balance speed with stability, allowing quick breaks and faster re-packing after storms.

    Beach and festival ready features

    UV-stable fabrics and sand-friendly floors

    Weather resistant inflatable tents for beach camping benefit from UV-stable fabrics that resist sun degradation and sand-friendly floors that shed grit. A low-profile footprint helps with wind resilience, and light colors reflect heat for interior comfort.

    Anchoring and ventilation

    Sturdy anchoring options and appropriate ventilation prevent heat build-up in warm beach settings. Integrated vents or mesh panels assist airflow without compromising privacy or debris protection.

    Quick deployment and budget considerations

    Built-in pumps and rapid deflation make affordable inflatable tents for festivals easy to deploy and pack between acts. Budget-friendly options often balance price with essential durability and weather resistance, delivering reliable performance without compromising on quick setups.

    These profiles align with real-world needs, ensuring you select an inflatable tent that fits your planned trips and conditions while delivering consistent setup efficiency and pumping options.

    Setup efficiency and pumping options

    inflatable camping tents image

    Inflatable tents speed up the initial setup, especially when you’re juggling kids, gear, and weather concerns. The quickest setups come from airframe tents with built-in pumps or rechargeable packs, but you still need reliable valves, compatible adapters, and a plan for power in remote locations. For families, hiking trips, beaches, and festival crowds, the right pumping option lowers stress and keeps your campsite dry and ready sooner.

    Built-in pump systems and power options

    Integrated pumps and power options

    • Some models include integrated air pumps or rechargeable battery packs for fast setup.
    • Check pump flow rate, battery life, and availability of spare batteries. For a typical family tent, aim for a pump that delivers 40–70 L/min and at least a full day of inflation on a single battery.
    • Example: easy setup inflatable tents with built in pump.

    Compatibility and adapters

    • Ensure valves match pump fittings; carry spare adapters so you can top off any section without hunting for tools.

    Power strategy for remote sites

    • For weather-resistant inflatable tents destined for beach camping or festivals, prefer a pump with USB-C or a small solar-recharge option. Pack a spare battery or two for multi-night trips.

    Manual vs electric inflation: trade-offs

    Aspect Manual pumping Electric pumping
    Speed Slower; precise control Fast; consistent pressure
    Weight Lighter overall Heavier (pump + battery)
    Noise Quiet Can be noticeable; choose low-noise models
    Power needs None Requires battery or outlet

    Noise, weight, and portability

    • Manual pumping is quieter and lighter—great for hikers or lightweight setups. Electric pumps speed inflation but add weight and potential fan or motor noise; look for models with auto shutoff to minimize wake-up calls at night.

    Speed and reliability

    • Electric pumps are valuable when you have kids or mobility challenges. Ensure the pump has a clear recommended pressure and safe auto-stop to prevent over-inflation.

    Practical setup tips

    • Inflate to the manufacturer’s target pressure, then finish with manual topping if needed. Confirm valve adapters work with your pump before heading out.

    Maintenance and failure prevention

    Regular inspections

    • Regular seam inspections and valve checks extend life. Look for hairline cracks, loose valve cores, or soft joints after rough transport.

    Cleaning and storage

    • Clean and dry tents before storage; store with slight tension to maintain shape and prevent deformation of air beams.

    Spare parts and repair kit

    • Keep spare O-rings, patch kits, and a small repair kit accessible. Carry a compact pump spare in your luggage for quick field fixes, and check that you have the appropriate patch material for inflatable camping tents.

    Inflatable tents FAQ

    Inflatable tents use internal air beams instead of rigid poles, delivering quick setup and a roomy interior. They come in airframe and pop-up styles, with options for family camping, beach trips, and festivals.

    What is an inflatable tent and how does it work?

    An inflatable tent uses internal air beams. Inflate each beam with a pump until firm, then attach the rainfly and stake it out. The air frame reduces pole fiddling and speeds pitching.

    Quick setup tips

    • Use the built-in pump when available.
    • Don’t overinflate.

    How durable are inflatable tents under wind and rain?

    Durability depends on beam quality, fabric, seams, and anchoring. With proper staking and guylines, inflatable tents handle wind and rain in moderate conditions. A sealed groundsheet and rainfly improve water resistance. If a beam punctures, carry a repair kit and spare valves.

    Durability tips

    • Secure with stakes and guylines.
    • Inspect seams and patch leaks.
    • Carry a repair kit.

    How do I choose the right size and weight?

    Size should fit occupants and gear. For families, 4–6 person inflatable tents balance space and pack size; for hikers, select lightweight models with built-in pumps to minimize weight. Compare packed size and inflation method before buying.

    Size and weight guidelines

    • Plan floor space per person plus gear.
    • Check packed weight and pump type.

    Conclusion and practical buying checklist

    Inflatable tents offer quick setup, impressive stability, and uncluttered interiors thanks to airframe design. When choosing, balance durability, speed of setup, and how well a model fits your 活activities, from family camping to solo hiking or beach festivals. See how each option stacks up against real-world use, not just marketing claims.

    Key takeaways for choosing inflatable tents

    Prioritize durability, setup speed, and fit for your activities.

    Durability matters most for gusty beach nights or rugged trails. Look for double-stitched seams, robust fabrics (polyester or nylon with a high denier), and reinforced anchor points. If you’re eyeing pop up tents or air tents, check how quickly the system inflates and holds air without constant topping up. For family camping, prioritize headroom and a stable floor; for hiking trips, emphasize lightweight construction and compact packs; for festivals, consider weather resistance and ease of transport.

    Match use-case (family camping, hiking, beach/festival) to model features.

    Family options should offer spacious footprints and multiple vestibules to keep gear dry. Hiking-oriented models skim ounces or kilos off the weight and shrink packed size, often with less interior dividers. Beach and festival inflatables benefit from wind resistance and storm-flap rain protection, plus built-in pumps or easy external pumps for quick setup after a day out.

    How to compare models using data and reviews

    Use quantified benchmarks: weight, packed size, time-to-inflate, and price.

    Compare numbers side by side. Typical ranges:

    • Weight: 4–8 kg for compact family tents; 2–4 kg for ultralight two-person setups.
    • Packed size: roughly 45 × 20 × 20 cm for small units; larger family tents around 60 × 25 × 25 cm.
    • Time-to-inflate: with built-in pumps, 60–180 seconds; manual pumps can double that.
    • Price: budget inflatables from $120–$250; premium family or weather-resistant models $350–$600.

    Cross-check these figures with mode-specific claims (best inflatable tents for family camping, lightweight inflatable tents for hiking trips, easy setup inflatable tents with built in pump) to narrow choices.

    Cross-check with warranty terms and real-user feedback.

    Read warranty duration and scope (materials, seams, pump). Look for user reviews that mention leak incidents, pump reliability, and durability under wind. A model with strong data and consistent positive feedback is more trustworthy than a price-only pick.

    Pre-purchase checklist

    Budget vs usage, environment, expected wear.

    Set a price ceiling aligned with your typical trips. If beach or festival use is frequent, plan for heavier sun exposure and sand ingress.

    Required pump type.

    Decide between built-in pumps, foot pumps, or battery-powered options. Built-in pumps simplify setup; battery pumps add flexibility.

    Spare parts.

    Stock a repair kit, extra valve adaptors, and a small patch kit. Keep it in the carry bag to handle minor punctures quickly.

    Warranty.

    Confirm coverage length and what’s excluded (abrasions, UV degradation, pinholes). Favor models with clear replacement policy and accessible service.